
When it comes to Excel page breaks, margins, page setups. and views, things can be fiddly. If you want your pages to neatly print or send to PDF, want some help with your view options, need to get rid of annoying page break ‘marching ants’, or are just wondering what ‘freeze panes’ does, this blog will help! Below is my video run-through these Excel 365 features on YouTube, otherwise read on for written explanations…
It is not just the information that is important. How it is presented is equally important.
Linda Armstrong
By the way, if you like the Excel workbook I use for this demo, you can download it from my ‘how to calculate years between dates’ post.
Explore Excel View Options and Handy Shortcuts
Excel for Office 365 is similar in most ways to prior versions of MS Excel. For example, it remains the case that there are multiple ways of doing the exact same thing; this can make using Excel confusing to beginners. Here I focus on the main view options you’ll regularly in the ‘ribbon’. This includes the relevant shortcuts to sort your Excel page margins and page breaks. As I outline in my introduction to Excel explainer, the ‘ribbon’ is simply the name of the suite of options at the top. In addition, most of the options you’ll rarely ever use! You can customise the ribbon to some extent, but that’s a fairly complex task for another day…
To keep things simple for now, here’s the three key features you’ll likely use most, when navigating view and print settings:

1. Print Preview: As I explain in the video, this is a handy shortcut button sits above the ribbon in the ‘Quick Access Toolbar’. Clicking it takes you to how your spreadsheet looks in print or PDF, plus page orientation and scaling settings. If you can’t see it by default, add it by personalising your toolbar with the drop-down arrow.
2. Ribbon View Options: The ribbon has countless buttons and features, half of which you’ll rarely ever use. However, to make things easy I’ve highlighted the things you’ll use most often. For example, ‘freeze panes’ simply means keeping certain rows and/or columns visible throughout any scrolling, as I demo in the video. I also like to hide the gridlines, headings, and formula bar to make my spreadsheets look less technical, before sharing it with end users. I encourage you to play about with these settings to see their effects.
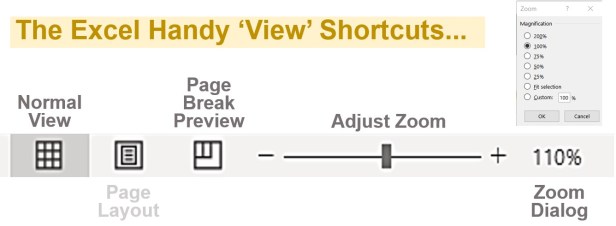
3. Handy View Shortcuts: Of course, you could use the various buttons for zoom size and switching between ‘normal’ and ‘page break preview’ in the ribbon. However, I find this box of tricks very helpful in the standard bottom bar of Excel for Windows. It’s always accessible regardless of which ‘tab’ of the ribbon you’re using. This means you can quickly switch between the views and adjust the zoom level, whatever you’re working on.
Here’s a closer look at those view and zoom shortcuts. I most often just use the ‘Normal‘ view. Most of the time, this is the best way of working with your spreadsheets. I rarely find a use for the ‘Page Layout‘, hence I’ve greyed it out. The ‘Page Break Preview‘ comes in handy when you want to manually adjust and refine where your page breaks start and finish; this is only really relevant if you want to print off your work or share it in PDF format (simply Save As > PDF). To do this, simply click and drag the bright blue lines around your work. But I mostly use this area to adjust the zoom; either using the +/- increments or by clicking on the percentage for the bespoke zoom dialogue box.
Sort Excel Page Breaks
Using the quick ‘Print Preview’ button highlighted in point 1 above, you have a powerful yet simple array of options to help make your workbook more presentable for your intended audience. Whether that’s getting things ready for the printer, or more likely in this post-pandemic world, emailing/sharing a PDF.
The image below demonstrates the main options presented to you from this shortcut. The initial drop-down menus present you with the key options for quick access, or you can click the ‘Page Setup‘ link to open the full suite of page options.

You can quickly adjust the page margins (buffer space) around the edge of your page under the margins drop down. Similarly, you can adjust the scale of what you present; for example, ensuring your dashboard fits all on one page. I’ve highlighted these quick access drop-down option in green above, but you’ll see them repeated in the popup dialogue box. The best way you’ll learn is trying it out, exploring what changes appear on the preview page!
You can also change whether your pages present in portrait or landscape orientation, choose your paper size, and whether to print/PDF just the sheet selected or multiple sheets of your workbook. For the margins around the page, I quite like customising by narrowing slightly (as presented in the video). This gives a nice buffer around your page, while also maximising the use of space on the page. You might like to experiment with shading in some cells around the perimeter of your content to create a border.
Once you’ve sorted your page breaks however, Excel does something annoying and weird; here’s how to fix it…
How to Remove the Page Break ‘Marching Ants’ in Excel
Unfortunately, Excel in Office 365 is also similar to prior versions (and Excel for Mac) when it comes to a weird page break quirk. After sorting your page breaks, it shows you where the page breaks are with dashed lines (aka ‘marching ants’) back in normal view. I never asked for this! And unfortunately, the setting to fix it is buried deep in the Excel options. But fear not, here’s how you remove the page break dashed lines in your spreadsheet(s):
- Click ‘File‘ (in top left of window)
- Click ‘Options‘ (in bottom left of window)
- Choose ‘Advanced‘ within the new ‘Excel Options’ popup window
- Scroll to ‘Display options for this worksheet‘ headed section
- Uncheck ‘Show page breaks‘ box
- Click ‘OK‘
So here’s a screengrab showing where that ‘Show page breaks’ sneakily-buried option is in the popup window (step 3 and onwards). I hope this saves you a great deal of time and aggro now you know where it’s buried! I’ve suggested to MS Excel developers to put this checkbox in the ribbon view settings, so hopefully the journey will be less arduous in future versions.

I hope you’ve found these how-to instructions and video on Excel page breaks helpful. Subscribe to my EATO YouTube channel for more MS Office how-to videos and presentations. Liking the content? Please like and share with friends and colleagues who may also find it useful. If so inclined, supporting my work helps keep free content flowing. Want fantastic, time-saving templates just for you and your business? Then please get in touch to arrange a bespoke quote. Finally, please feel free to leave your feedback below and/or comment on what tutorials and templates you’d like created.
Kind Regards, Adrian